Shop

5 ways to stop dirt in its tracks

Image courtesy J & M Home Fashions LLC.

It’s your home’s dirty little secret: much of the grime in your house comes from outside, trekked in on shoes that don’t appear to be either muddy or dirty.

Fortunately, a bit of smart planning can keep those messes from ever getting inside. We run down the top five ways to stop dirt at the door.

1. Choose the right doormats

Ideally, your house should have doormats at every entrance and exit. The mats should be as wide as the door’s width, and long enough to cover the length of a typical stride – that way, people will walk over the mats as they cross the threshold, depositing dirt into them as they go.

When selecting an outdoor mat, choose a durable material like rubber that can withstand the elements. If your area is prone to wet conditions, consider installing an outdoor wire rack to scrape off mud.

Indoor mats come in a variety of materials; look for mats that can be easily cleaned with a vacuum cleaner or shaken clean outside. Clean your mats at least once a week.

2. Keep pets from bringing their messes inside

Let’s face it: dogs and cats are less than diligent about wiping off their paws before coming inside, which is why you need to be ready to clean up after them. Keep a rag or towel handy near the door to wipe off dirt, water and mud. Brush your pet’s coat regularly to keep hair from accumulating indoors. Most importantly, do these things outside – there’s no sense unleashing tumbleweed-sized hairballs in your home.

3. Use floor mats indoors

Use indoor floor mats to catch dirt in high traffic areas like the fridge, the kitchen sink, the toilet and the bathtub. Be sure to choose non-slip mats to keep your dirt-catchers from becoming tripping hazards.

4. Prevent dirt from traveling through your house

Open doors and windows are an invitation for all kinds of particulate matter to occupy your home. Keep screens on windows and doors leading outside. Keep doors inside closed. You can also install door sweeps to keep dirt and debris from sneaking under entranceways.

5. Keep outdoor shoes outside

It can be tempting to hop outside in your loafers to grab the paper, but be sure to take off those shoes (or at least wipe off the soles) before you walk around the house. If your home doesn’t have a mud room, consider designating a garage, closet or shoe cubbie as the place to put outdoor footwear. If it was worn on your feet outside, it should stay outside.


How to tackle grass stains on clothing

You can be sure these clothes are going to have grass stains on them by the end of the day (istockphoto.com)
You can be certain this kid’s outfit is going to have grass stains on it by the end of the day. (istockphoto.com)
 

If you enjoy spending time outdoors in the summer, you know that nature inevitably leaves its mark on your clothes in the form of unsightly, hard-to-clean grass stains.

You can blame chlorophyll, the chemical that gives plants their green hue, for ruining your favourite pair of jeans. In addition to being a strong dye, chlorophyll binds well with natural fibres, making it notoriously difficult to remove.

While delicate materials like silk or wool should always be handled by a professional dry cleaner, denim and cotton clothes can benefit from grass cleaning solutions you can make at home. The basic steps are similar in each case:

Note: Some cleaners can fade or discolour clothing. Always “spot test” cleaners on an inconspicuous location before applying it to the stain.

Step 1: Give the stain a hot water bath. Run the stain under hot water, preferably using a high-pressure nozzle. This will remove any solid grass pieces and loosen the stain. For best results, you should clean the stain as soon as possible to keep it from setting.

Step 2: Scrub the stain with detergent. Any liquid detergent will do. Use a scrub brush or a toothbrush and thoroughly scrub the affected area, then rinse.

Step 3. Apply a cleaning agent. There are literally dozens of products that claim to remove grass stains, but the simplest and most cost-effective home remedy is a mixture of baking soda and white vinegar. Sprinkle baking soda on the stain, then pour the vinegar over top and scrub the mixture while it fizzes.

Step 4: Launder in warm or hot water. Most denim clothing can handle your washer’s hot water cycle, while cotton clothes can be washed in warm water. Just in case, you should always follow the washing instructions on the label. Wash with detergent as normal.

If the stain persists after step 4, don’t put the clothing in the dryer – this will cause the stain  to set. Instead, repeat steps 3 and 4 using “harsher” cleaners, starting with rubbing alcohol and then progressing to chlorine bleach. You can also try natural digestive enzymes, which are available at most health food stores. Mix the contents of several enzyme capsules in lukewarm water until you get a mixture with the consistency of toothpaste. Scrub the mixture into the stain and let it sit for 20 minutes, then repeat step 4.

One step ahead: caring for your floors

Goodbye, snow and slush. Hello, water and muck. Your floors never get a break, no matter the season. Whether you’ve got hardwood, ceramic or vinyl underfoot, follow these tips to keep your floors properly maintained year-round. (Too busy to clean your floors? Goldstar Cleaning can help with all your floor-care needs.) Stripping and waxing
Your floor puts up with a lot, from dirt to pet hair. Make sure to return the favour by cleaning your floor regularly.
Floors with a wax finish should have the wax stripped and then reapplied at least once a year to maintain their shine and protect the floor from damage. There are different kinds of wax strippers for hardwood, vinyl and masonry (ceramic or stone) flooring; check with your local cleaning supply store to find the right kind for you. (Note: wax strippers are toxic and give off fumes. Be sure to use wax stripper in a well-ventilated area, and wear rubber gloves when handling.) To strip wax, apply a layer of stripper to a small area of floor, then wipe the area with a scrubbing pad to remove the waxy buildup. Use a scrub brush or a toothbrush to remove wax from corners and hard-to-reach areas. Use a putty knife to remove large wax deposits. Once the old wax has been removed, it’s time to apply a new layer. Apply the wax sparingly directly on the floor, and spread it into a very thin coat using long, straight strokes with a wax applicator or sponge mop. Open windows, and let dry to a shine. Apply two or three thin layers of fresh wax, being sure to allow each coat to dry thoroughly before applying the next. Buff your floor between wax applications to remove scratches and keep the surface looking radiant. Vacuuming, mopping and sweeping Regular vacuuming or sweeping will remove surface dirt from your floor. It also makes mopping and waxing less arduous. In addition to vacuuming, you should wipe your floor with a rag mop once a week to clear away surface stains. For vinyl, laminate and masonry floors, try a mixture of one part water, one part alcohol, one part vinegar and a few drops of dish washing liquid. Fill a spray bottle with the mixture spray, the floor, and mop. The alcohol sanitizes and helps dry the floor quickly, while the vinegar and dish washing liquid cuts through the dirt and grease with ease. Daily care for your floor Floors can be divided into two varieties: those that you can get wet, and those that you can’t. A wax finish does not make your hardwood floor water-proof. Wipe spills with damp paper towels as soon as they hit the floor, and buff the area with a soft, dry cloth. Avoid dragging furniture across your floor, which can scratch the surface. Attach felt or nylon glides to the legs of heavy furniture items, and check the glides occasionally for dirt, which can also scratch. Use area rugs or mats in high traffic areas like vestibules.

Home Renovations: 5 Great Rebate Programs

March 31, 2013 marks the end of the LiveSmart BC Efficiency Incentive Program, a tax rebate program for homes investing in energy-saving renovations. Since 2008, the wildly popular program has awarded over $77.5 million in incentives to 100,000 participating households. If you missed the deadline, never fear. There are plenty of other provincial and federal programs encouraging homeowners to invest in home renovations.. We round out our top five. (Certain restrictions may apply. Check websites for program details and deadlines.)   B.C. Seniors’ Home Renovation Tax Credit This year-old program assists individuals 65 and over with the cost of certain permanent home renovations to improve accessibility or help a senior be more functional or mobile at home. New Housing GST/HST Rebate: This federal program is meant to defray a portion of the GST or HST paid on a new house or substantially renovating an existing house, up to a maximum of 1.5 per cent of the GST/HST. Power Smart Incentives and Rebates BC Hydro’s program includes rebates for light fixtures, windows and home electronics. Switch ’n’ Shrink This Terasen Gas incentive gives homeowners a $1,000 rebate for switching to Energy Star natural gas heating systems. Other rebates and incentives are available for installation of an EnerChoice fireplace, and storage tank and furnace upgrades. Financial Assistance Canada Mortgage and Housing Corporation (CHMC) offers financial assistance to low-income homeowners, persons with a disability, homeowners in rural areas and seniors seeking home adaptations. (cmhc-schl.gc.ca)

5 iPhone apps to help you clean your home

A screenshot from “Chore Hero.”
You can do pretty much anything with your iPhone – everything, perhaps, except clean your house. Until Apple designs and iMaid, check out these five apps designed to make household chores more manageable.
Custom Hypnosis: House Cleaning Edition ($1.99) Using “specialized audio,” this app promises to turn time-consuming chores into hours of hypnosis-induced entertainment! HomeRoutines ($5) Like the gentle prodding of a parent, HomeRoutines helps you keep track of your cleaning goals. Create routine checklists, receive reminder notifications and create a “gold star” reward system for completing tasks. Clean Freak Cleaning Schedule ($.99) Designed by working parents, Clean Freak uses the “divide-and-conquer” approach to cleaning, breaking chores into 15 to 60 minute rotations. Green Shine ($1.99) Using a database of recipes based of household items, this app provides environmentally friendly solutions for more than 100 everyday housekeeping tasks, from simple window cleaning to stain removal. Chore Hero ($2.99) Is your family competitive? Chore Hero turns cleaning into a contest by allowing you to assign tasks to various members of your household. The app awards awarded points for each completed chore, with the winner being crowned the “Chore Hero.”

Citrus fresh: How to make natural household cleaner of out orange peels

Most people are well aware of the cleaning powers of vinegar. As an eco-friendly solvent and disinfectant, vinegar is cheap, versatile and a staple in most households. So, why don’t more people us it to clean their homes? If you’re anything like me, one of the major turn-offs of vinegar is its pungent odour. Luckily, there are ways around this smelly conundrum, with help from another natural source – orange peels. I say orange peels, but lemons, limes and grapefruits work equally well. That’s because the rinds of citrus fruits contain d-limonene, the compound responsible for that “citrus fresh” scent. D-limonene is a solvent and disinfectant in its own right, which is why it’s often used in commercial cleaners, air fresheners and soaps. So stop throwing out your orange peels, and instead follow this simple recipe to make your own vinegar-based citrus cleaner. What you’ll need: Orange or citrus fruit peels Distilled white vinegar Water A large, airtight glass container Strainer Spray bottle   Directions: -Fill an airtight glass container with citrus peels. -Fill the container with white vinegar so that the citrus peels are covered. -Seal the glass container and store it in a cool, dry place for two weeks, or until the vinegar takes on a strong citrus odor (the concoction should also change colour, depending on the fruit used). -Strain the liquid and pour into a spray bottle, adding water as desired to dilute the solution (a 1:1 ratio will reduce the pungent smell, while maintaining the cleaning power of the solvent.)

Good as new: How to clean jewelry naturally

For couples, Valentine’s Day is a time to celebrate the special love between two people. But for retailers, February 14 is a day for big consumer spending. The average Canadian household will spend $37 on Valentine’s Day gifts this year, according to The Retail Council of Canada. (Fun fact: Ontarians, are more likely to buy jewelry for their special someone than residents in any other province). So, if you’re lucky enough to get a bracelet, necklace or – gasp! – engagement ring for Valentine’s Day, follow these easy tips to keep your jewelry sparkling and new for years to come. Cleaning Silver -To remove tarnish from silver pieces without gemstones, try a soaking bath. Line a glass roasting pan with aluminum foil, dull side facing down. Put silver pieces on top of the aluminum foil. Pour about 1 litre of boiling water over the pieces and add 2 tbsp. of baking soda. Allow the silver to soak for five minutes, or until the water is cool enough to touch. Dry the silver with a clean polishing cloth. -If your silver piece contains gemstones, do not submerge it in water; water can rust or discolor your settings or cause the stones to become loose and fall out over time. Toothpaste, with its mild cleaning agents and gentle abrasives, is an effective single-ingredient cleaner for polishing tarnished silver. Apply the toothpaste to silver with a clean cloth. Avoid touching the gemstones. For intricate pieces, use a clean, soft-bristled toothbrush. Let the pieces air dry by placing them upside-down on a clean cloth. Cleaning Gold and Platinum -To clean gold or platinum jewelry that doesn’t have gemstones, use a mixture of soap and water. Fill a small bowl with warm water and add a few drops of mild dishwashing liquid. Submerge your gold jewelry in the mixture. Let the jewelry soak for 20 minutes, then rinse the jewelry thoroughly under running water. Dry the gold with a clean polishing cloth. -Never submerge gold or platinum jewelry with gemstones under water. Instead, dampen a clean cloth with the soap-and-water mixture mentioned above. Gently wipe down the piece, then use a cloth that has been dampened with water to clean off the soap. Let the pieces air dry by placing it upside-down on a clean cloth. Cleaning Copper -Pure copper jewelry (without gemstones) requires an mildly acidic solution to remove tarnish. Fill a small bowl with warm water and add a few drops of pure lemon juice and a teaspoon of salt. Submerge your copper jewelry in the mixture. Let the jewelry soak for 20 minutes, then rinse the jewelry thoroughly under running water. Dry the gold with a clean polishing cloth. -The same rule applies to copper jewelry as with gold and silver: do not submerge pieces containing precious stones in water. For these pieces, you can use ketchup (yes, ketchup!) to clean the piece. Add a small amount of ketchup to the copper with a clean cloth, or use a clean, soft-bristled toothbrush. Let the pieces air dry by placing them upside-down on a clean cloth.

Checking out: How to avoid germs during your hotel stay

Whether you’re on vacation at a tropical resort or away on business, your hotel room is supposed to be your home-away-from-home. Unfortunately, that “home” was used by hundreds of strangers before you arrived – and they may have left more than just a pair of dirty socks behind. A recent investigation by CBC’s Marketplace found alarming levels of bacterial contamination on “high-touch” spots in hotel rooms across the country. The tests, conducted by University of Guelph microbiologist Keith Warriner in 54 rooms at six hotel chains, found that many commonly used surfaces and items failed to meet basic sanitation standards, and in some cases contained dangerously high levels of bacteria. And if you think you can avoid the problem by opting for a luxury suite, think again; Warriner’s test found that rooms at high-end hotels like Fairmont and Sheraton were no cleaner, on average, than rooms at budget hotels like Super 8 and EconoLodge. So, if you’re planning a special getaway this February, follow these simple tips to keep your hotel stay as sanitary as possible. Disinfect “high-touch” spots. The Marketplace investigation found that bathroom faucets and TV remotes were among the dirtiest items in most hotel rooms. Use an alcohol-based sanitizing wipe to clean these “high-touch” items, as well as the phone, door knobs, toilet handle and ice bucket. Set aside the comforter. It’s the dirty secrets of most hotels – they don’t clean the comforter for every new guest. It’s no wonder it was one of the filthiest areas uncoverd by Marketplace‘s investigation.  If you’re concerned about clean bedding, call and ask your hotel how often they launder their comforters, or just bring your own blanket. Give your glassware a quick cleaning. Most hotels require cleaning staff to wash all glasses in a dishwasher between stays – but the staff may have other ideas. Marketplace used hidden cameras to record housekeepers skirting the rules of basic cleanliness, including one cleaner at a high-end Toronto hotel who washed glasses with a touch of hand soap. To be safe, run all glassware (including your coffee pot) under hot water for at least minute before using. Stay away from the bathroom counter. Personal hygene products and bathroom germs don’t mix. Keep your toothbrush, razor and dental floss in travel containers and off the bathroom counter, where bacteria is likely to propagate. Don’t let the bed bugs bite. Bed bug infestations have risen sharply across North America in the past decade, according to Health Canada. Hotels are a prime breeding ground for the tiny blood suckers, who can then travel home with you and make your life very, very uncomfortable. To inspect for bed bugs, lift the mattress and look for reddish-brown spots on the mattress or other parts of the bed (that’s bed bug excrement). Don’t expect to see any live insects; though visible to the naked eye, bed bugs are adept at hiding in small cracks and crevasses. You should also check for bed bug poop between couch cushions and in the space between the carpet and the wall. Bed bugs feed at night, leaving behind itchy red bumps on the skin, similar to mosquito bites. If you discover any signs of a bed bug infestation, inform the front desk immediately and request a new room. Never leave luggage, clothes or purses on the bed or floor of your hotel room, where bed bugs can easily climb aboard. Instead, put these items in the bath tub or on the luggage rack.

Spruce up Your Spruce: Caring for your Christmas tree

A natural Christmas tree has a way of conjuring up memories of holidays past; the pungent smell of fresh pine needles, the sight of twinkling lights wrapped around the branches – not to mention all the colourful gifts waiting to be opened underneath – are all powerful reminders of the spirit of the holidays. Without proper care however, your majestic Christmas tree can quickly become a Charlie Brown-style twig or even a fire hazard. By following these six steps, you can avoid a cleaning headache on Boxing Day. 1. Choose your tree wisely. Not all Christmas trees are created equal. Fir trees, like the Douglas or Balsam Fir, and pine trees like the Scotch or White Pine hold their needles long after being cut down. Other varieties, like the Nordic or White Spruce, have poor needle retention and should only be bought and used as “living” Christmas trees (with the roots still attached). 2. Pick a healthy specimen. As a general rule of thumb, fresh-cut Christmas trees will last longer than pre-cut ones. Watch out for trees that have a large number of browning needles, or ones whose needles are rigid or fall off when brushed – they’re well on their way to becoming kindling. 3. Keep your tree hydrated. After bringing your tree home, cut about an inch off the trunk to allow water to flow into the stump. Keep your tree outside in a bucket of water for a few hours before mounting it indoors. You should purchase a Christmas tree stand that allows you to water your tree, and change the water at least once a day. 4. Cover your floor. Protect your floor from pine needle, debris and sap by choosing a tree skirt that is at least as wide as the tree, if not longer. For easy cleanup, place a plastic tarp on the ground under your tree skirt. When you’re ready to take your tree out to the curb, simply roll up the tarp and toss any fallen needles into the trash. 5. Remove any fire hazards. Keep your tree well away from fireplaces, space heaters, candles or other sources of heat; they’ll not only dry the tree out, they can also cause it to ignite. Check the cords of Christmas lights for exposed wiring and replace any bulbs that aren’t working. 6. Decorate with care. After mounting your tree, give it a day before decorating, to allow the branches to settle into their natural position. Add the heaviest decorations, like the lights, first, wraping them closest to the tree. Follow them up with draping decorations like tinsel, then the ornaments, and finally the star!

Six Ways to Prepare Your Home for Winter

 
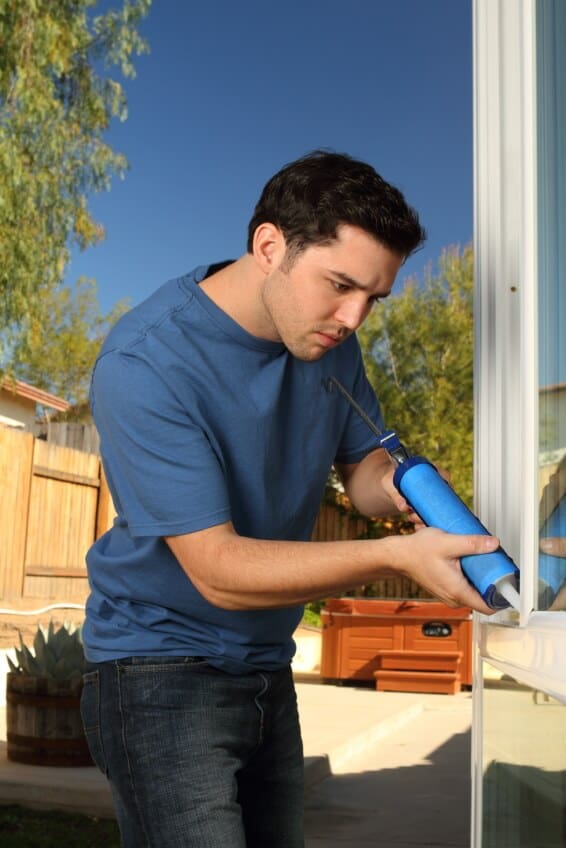
Caulk your window frames inside and out and weatherstrip around doors to prevent leaks. (istockphoto.com)
  If you thought last year’s mild winter was the new norm, think again. While Canada posted the third warmest winter on record in 2011-2012, meteorologists with AccuWeather are predicting a healthy dose of snow and cold across the nation this season. Alberta and British Columbia, in particular, are expected to experience colder and drier conditions than usual. But homeowners need not fear; by winterizing areas in and around the house, you can easily keep Jack Frost’s icy grip at bay. Gold Star Cleaning offers these six tips to get your started. 1. The Furnace and fireplace Preparing your home’s heating system for winter won’t just save you money on your heating bills – it could also save your life. A build-up of dust or debris over the summer months can turn your furnace or fireplace into a potential fire hazard, so it’s important to make sure they’re functioning properly. Here’s a quick to-do checklist: -Have your furnace inspected annually by a qualified HVAC technician. Have your ducts cleaned every three years. -Clean or replace your furnace’s air filter. -Clean your vents, and ensure that vents are not obstructed by furniture or debris. -Have your chimney cleaned, and cap the top of your chimney. -Remove any flammable objects from around your furnace and fireplace. Star tip: remove glass from gas fireplaces with a screwdriver, lay flat on a drop sheet and wipe away stubborn mineral deposits using a gas fireplace glass cleaner. 2. Smoke and carbon monoxide detectors While we’re on the topic of fire safety, now is a good time to ensure you have a working fire detector in your home, as required by law (the Office of the Fire Commissioner of British Columbia has a break-down of the new requirements for smoke detectors in private dwellings, which have been in place since 2010). If your smoke detector is battery-powered, replace the batteries in your smoke detector and test it. Replace smoke detectors every ten years. If you haven’t yet installed a lifesaving carbon monoxide detector in your home, get one. 3. Doors and windows Keep the warm air in your home by identifying and sealing leaks. An easy way to find leaks is by holding a candle near the edges of a window or door frame; if the flame flickers or goes out, you have a leak. Caulk your window frames inside and out and weatherstrip around doors. Remove your summer screens and install storm windows (or use good ol’ fashioned shrink wrap). 4. Roof, gutters and downspouts Take it from me – you don’t want to be climbing on your roof in the dead of winter to fix a leak. Take the time now to replace any damaged roof shingles or tiles, clear out of your gutters and install leaf guards. If necessary, add piping to your downspout so that it transports water at least 10 feet away from your home. If your home has an attic, add additional insulation to keep warm air from escaping and forming condensation or ice dams in your home. 5. Pipes and Plumbing A burst pipe  can cause untold damage to your home. Avoid this potential catastrophe by targeting pipes where water is likely to freeze. Turn off the water to your hose bibs via the shutoff valve inside your home. Look for exposed pipes in your house – likely locations include crawlspaces, basements or garages – and wrap them with foam rubber sleeves or fibreglass insulation. If you’re going away for the holidays, keep the temperature in your home above 50 degrees Fahrenheit (10 degrees Celsius) to reduce the risk of freezing. Star tip: Check that sump pumps are working and ready for the spring thaw.  If you do have flooding problems later on  a cleaning company that does restoration cleaning is a number you will want to have on hand. 6. The Great Outdoors Spring may seem like a distant memory, but that’s no reason to neglect your yard. Trim any tree branches hanging close to your house or near electrical wires. Protect garden tools and outdoor appliances by cleaning and storing them. Drain your garden hose. Remove the gas from your lawnmower – and while you’re at it, fill up the tank in your snowblower and test it. Finally, make sure you’re prepared for the inevitable snowfall with a sturdy shovel and bags of sand or salt. Star tip: Insist that people remove their shoes at the door and keep a rubber boot tray at each one to prevent the outdoors coming indoors.